Categories
Projects Video Games

Virtual Boy Broken Screen Line Fix (Kinda)

If you haven’t noticed I have been a Virtual Boy kick as of late. I have a thing for dead, semi-forgotten machines, ok (see Brave Little Toaster).

A common problem with Virtual Boy, as with the Game Boy, is the LEDs and Screens are attached using an adhesive instead of solder. This is great for the short term, but in the long term the contacts ten to lift as the adhesive ages. There are a couple ways to fix this. There is the much harder, more tedious way of soldering the points directly to the ribbon cable. This involves etching away the old adhesive and having very steady hands. I opted for the second route: take the LED array out and try to re-melt the adhesive using an oven. So, this is that tale.

Photo Feb 13 12 47 54 PM

The Virtual Boy pre-strip.

Photo Feb 13 12 47 48 PM

Older Nintendo (maybe current, too) uses a special screw design to prevent tampering known as GameBit. It’s a weird looking star. I had a bit for that, but as long as it was (2″ probably) it still wasn’t long enough to reach the most sunken screws in the Virtual Boy. I had to use a dremel tool to grind away more of the bit so it could fit. Even then it barely made it. Nintendo is serious about the no tampering thing.

Photo Feb 13 12 53 15 PM

The naked Virtual Boy.

Photo Feb 13 1 15 02 PM

The LEDs ready for the oven.

Photo Feb 13 1 21 52 PM

Out of the oven. After this you are supposed to vigorously rub the contact of the ribbon to the board.

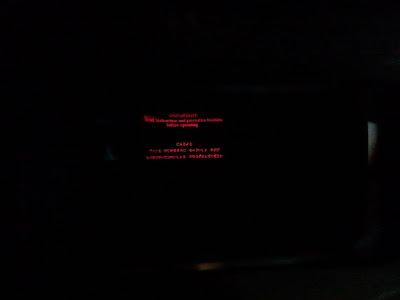
The result after this was that it still didn’t fix my problem. Although unlikely, one of the LEDs might be burnt out. I only left it in the 200 degree oven for 2 minutes. I am going to try for 5 minutes next time. I only need to do the right one now that I know the culprit. I hope the next time it works. That one dead line of pixels is far more annoying than it should be.

Categories
Projects Video Games

Virtual Boy Power Mod Revisted

If you remember I semi-recently modded my virtual boy to run on AC power instead of having to buy an expensive AC Adapter.

Well there was several after-the-fact things I noticed.

1. Two cords going opposite way jutting out from the controller. It was really obtrusive.

2. When I put the jack inside there controller there was not a lot of real estate so I had to rip out a lot of the structure inside. That never sat right with me.

3. It looks ugly. Butt ugly. Ugg buttly.

I decided that I would do it right. My good(ish) name would not be besmirched with such shoddy craftsmanship.

I bought myself a brand-new, used controller off eBay to try my hand at this again.

Workbench.jpg

The workbench for this process.

Jack.jpg

Power Jack

AC/DC Supply.jpg

AC Adapter. It supports world voltages so it can be used anywhere with only a physical change to the prongs.

Soldered.jpg

The controller board with the wires soldered on.

Contact Points.jpg

Those are actually the contact points for the power. They take 9V DC @ 350 mA at least.

Jack Soldered.jpg

Here is the completed AC Jack. I drilled a small hole out of the top of the controller so the cords are aligned in the same direction.

hookedup.jpg

Everything hooked up.

power.jpg

Closer view of the power connection.

controllerfinished.jpg

The new controller.

oldnew.jpg

The old and new together.

Overall, much better than before. All the internal integrity is retained and the feel is much less obtrusive. The AC-DC supply itself is also much more versatile. I have a few more projects planned for the VB before I call it done, including trying to fix a broken LED in the array leaving a blank strip when viewing. The ribbon cables were secured with poor adhesive so it’s probably that, but it needs to be fixed. Stay tuned!

BTW: I got all my parts from Digi-Key for those interested.

Categories
Projects Video Games

Virtual Boy Power Mod

This is one that has been in the hopper for QUITE a while. I am so glad to have it done now. The Virtual Boy is long considered to be Nintendo’s big flop. I don’t know why I love it so much. The games aren’t great (save Wario land), it is only displays red, even playing it is pretty uncomfortable. Despite all it’s flaws I love the li’l guy. Here is where my project comes in. The virtual boy is powered by 6 AAs out-of-the-box. There is an AC adpater you can buy, but it’s rare-ish and expensive. I decided, hey I am a dude who knows things, I’ll just add my own AC adapter. That is what I did.

I found that it needed to give it 9V DC. I went to my local Radio Shack to purchase the jack and plug and got a universal AC adapter that could output 9V.

Inside the Controller

Where I need to solder to. VCC (+) and GND (-)

The jack

Soldered up and testing

It works!

Not a lot of room, but trying to fit it into place

Cutting away some plastic for the jack

All sealed up and looking good

The finished product, Virtual Boy looking proud